Fastest way to warm an AWS Redis Elasticache with JSON data

After creating an a Elasticache instance for Redis and loading it with data dynamically, it became apparent that it would be useful to warm the cache with a large dataset to further improve performance.  Redis recommends using their Luke protocol to accomplish this by creating a text file with the data and then use the redis-cli to import that into Redis directly. This approach is significantly faster than doing it programmatically. Here I’ll elaborate on the steps I took to do that.

The first step is to create a text file with the data you want to import.  The basic structure is:

set [key] "[JSON string]"

set [key] "[JSON string]"

set [key] "[JSON string]"
...

However, the devil is in the details. First, you must escape all the quotes in your JSON string. Also, you must be sure to have a carriage-return/line-feed after each line or your data won’t import. This is required even after the last line in your file.

Once you have your file, you then need to create (or use an existing) EC2 instance to call your redis instance and import the data.  On your EC2 instance you first need to install gcc to build the redis-cli and then make the redis-cli code.  Here are the steps:

sudo yum install gcc

wget http://download.redis.io/redis-stable.tar.gz
tar xvzf redis-stable.tar.gz
cd redis-stable
make

Once you do this, you can then pipe your text file into your Redis instance using the following command:

redis-stable $ cat import.txt | ./src/redis-cli \
-h [elasticache hostname from replication group] -p 6379 --pipe

That’s it! If you want to schedule this on interval, you can simply create a cron job to refresh your cache as needed or use an event driven architecture to update the cache based on changes from the source system.

Protecting Node.js services written with Restify using Passport

I’ve been using Restify to create all my REST endpoints for the various services that I write. Invariably, I need to protect these services end-to-end. For client-facing UI’s I do that with OAuth, but my OAuth proxy needs to access the actual underlying service. To do that safely, I do this over HTTPS and I created a service account and used the passport-http module to do BASIC authentication with the backend service.

Here’s a smallish node.js module that I wrote to accomplish this:

    var restify = require('restify'),
        userId = process.env.ID,
        pwd = process.env.PWD,
        passport = require('passport'),
        BasicStrategy = require('passport-http').BasicStrategy;

    passport.use(new BasicStrategy(
        function (username, password, done) {
            findByUsername(username, function (err, user) {
                if (err) {
                    return done(err);
                }
                if (!user) {
                    return done(null, false, { message: 'Incorrect username.' });
                }
                if (user.password !== password) {
                    return done(null, false, { message: 'Incorrect password.' });
                }
                return done(null, user);
            });
        }
    ));

    // Just use a single user that can access this service set from deployment var
    var users = [
        { id: 1, username: userId, password: pwd}
    ];

    function findByUsername(username, fn) {
        for (var i = 0, len = users.length; i < len; i++) {
            var user = users[i];
            if (user.username === username) {
                return fn(null, user);
            }
        }
        return fn(null, null);
    }

    exports.authenticate = function (req, res, next, callback) {
        passport.authenticate('basic', function (err, user) {
            if (err) {
                return next(err);
            }
            if (!user) {
                var error = new restify.InvalidCredentialsError("Failed to authenticate.");
                res.send(error);
                return next();
            }

            callback(req, res, next);
        })(req, res, next);
    };

To use the module, all you have to do is “require” it and make a call to it passing in a callback function to the REST service that you’ll end up calling once authenticated. This is a simple example of that:

    var basicAuth = require(__dirname + '/../utils/authn.js');

    exports.viewPostsByUid = function (req, res, next) {
        basicAuth.authenticate(req, res, next, function() {
            validateParam(req.params.uid, next);
            var url = '/posts/' + encodeURIComponent(req.params.uid);

            processRequest(req, res, next, url);
        });
    };

As you can see, it’s fairly trivial to protect your services with BASIC authentication and is a good line of defense for any attacks directly to the service itself.

Deploying Meteor 1.0 apps with a Heroku Buildpack that does NOT use Meteorite

I’ve been using Meteor since 0.6.x and not too long ago Meteor was using a package system called meteorite. Now with Meteor 1.0, meteorite has been deprecated so this ultimately changes the way you can deploy your application should you want to do that with a Heroku buildpack.

I was getting exceptions with fibers and a recommendation to add ROOT_URL to my config which I didn’t have to do previously on version 0.9.3.  But once I updated to this buildpack: https://github.com/AdmitHub/meteor-buildpack-horse, life was good.  I also added the ROOT_URL: [http://myapp.com] to my config and I was back to successfully deploying my Meteor app using this new buildpack which has no dependency on meteorite.

Updating an existing Cordova App to iOS 8

Here are a few tips when you are ready to upgrade your existing Cordova App to iOS 8.  I migrated my Cordova 3.3.0 app this morning successfully following these instructions.

Step 1

Run npm install to upgrade Cordova to the latest with the following sequence of commands:

npm install -g cordova
cd my_project
cordova platform update android

Step 2

Update your project’s “Build Settings” for the target as follows:

    Build Active Architecture Only: “Yes”
    Valid Architectures: “arm64 armv7”

Step 3

If you’re updating an older version of Cordova, you will need to comment out or remove these lines from the “MainViewController.m” class:

- (BOOL)execute:(CDVInvokedUrlCommand*)command
{

    return [super execute:command];
}

Step 4 (optional)
If you need to have your WebView adjust the top 20px to account for the iOS 7/8 status bar, install the following plugin and update your config.xml accordingly. I have mine set as follows:

    <feature name="StatusBar">
        <param name="ios-package" onload="true" value="CDVStatusBar" />
    </feature>
    <preference name="StatusBarOverlaysWebView" value="false" />
    <preference name="StatusBarStyle" value="lightcontent" />
    <preference name="StatusBarBackgroundColor" value="#000000" />

Shazron’s blog goes into more details on a few other essential plugins here.

By Loutilities Posted in General

XCode 5.1/iOS7.1 requires upgrade and patch to Cordova

I discovered yesterday that Cordova doesn’t play too nicely when you upgrade XCode to 5.1 so you can deploy to iOS 7.1 devices.

That said there are several steps that you need to follow in order to get Cordova working again in 5.1 prior to the Cordova 3.5.0 update being released:

  1. Update your local version of cordova using: npm install -g cordova (this should upgrade you to 3.4 if you were on a previous release, which I was on 3.3.0)
  2. You then need to upgrade your version of Cordova for your projects by issuing cordova platform update [ios | android] (do each separately and any other platform you may be using)
  3. Once upgraded, you’ll want to add the diffs from this post. They’re basically patches for the time being until Cordova 3.5.0 is released. Thanks much to @shazron for these!
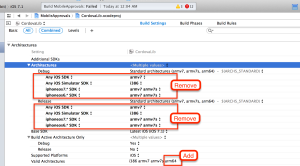
  4. After that you can follow these directions from Shazron to ensure you have XCode configured properly. It’s very important you remove ALL these extra settings (e.g. Any iOS SDK, etc.) under Architectures->Debug (and Release) and add “arm64” to Valid Architectures for your CordovaLib project settings (then target) as follows:cordova-ios-71
  5. To get it working in Android you have to re-add the platforms/android/CordovaLib directory to be sure the new JAR is introduced into your project. I use IntelliJ so all you have to do is remove the old one under Project Structure and add the new lib.  Then add the resulting lib to your Android project and move it up to the top in your dependency list.

Hopefully this gets you up and running quickly again!

2013 in review

The WordPress.com stats helper monkeys prepared a 2013 annual report for this blog.

Here’s an excerpt:

The concert hall at the Sydney Opera House holds 2,700 people. This blog was viewed about 35,000 times in 2013. If it were a concert at Sydney Opera House, it would take about 13 sold-out performances for that many people to see it.

Click here to see the complete report.

By Loutilities Posted in General

Grunt: Targeted environment builds for Node.js + JSHint + Closure Compiler

I’ve been using Node.js and was looking for a way to target my Node.js app for different environments (e.g., local, NONPROD, PROD). This would be especially useful when configuring different URLs and appnames and even setting up NewRelic, which I use for monitoring my application in different environments. Up to now, I’ve been doing these changes manually but discovered this tool Grunt that fit the bill. I come from a Maven build background for Java so we were looking for a tool that was similar for JavaScript. Not only can I do filtering but I can add plugins for things like JSHint, JS compression, unit testing, and a bunch of other nifty plugins.

To use Grunt for your Node app follow the getting started guide. After you install and configure it, you can refer my Gruntfile.js below which I used to set-up different environment variables, run JSHint and use Google’s Closure Compiler to minify it all. My basic approach is to create a “dist” directory where I copy the pertinent files to it. In my base directory, I have used $ variables assigned to the things I wanted to change in the files I wanted updated. I then used grunt-string-replace to update those based on the environment I was targeting. Let’s take a look.

On line 6, I clean the “dist” directory from any previous builds. On lines 7-13, I copy the files I want from the root directory to the “dist” directory (NOTE: user “!” to exclude files). Starting on line 14, I use string replace to update variables depending if I’m running dev or prod builds. Line 114, I run JSHint to make sure my code is in order. Line 127, I run node-unit for my unit tests and on line 130, I run Google’s closure-compiler to minify my JavaScript and use Advanced Optimizations for peak performance.

On lines 166-67, you’ll see how I call out different tasks depending on the target environment I’m after, in this case dev or prod. On the CLI, you can kick off the default which targets the DEV environment just by running “grunt” and for prod, just add that modifier, “grunt prod”. That’s all there’s to it!

(function () {
    'use strict';
    module.exports = function (grunt) {
        grunt.initConfig({
            pkg: grunt.file.readJSON('package.json'),
            clean: ["dist"],
            copy: {
                build: {
                    files: [
                        {src: ['./**/*.js', './*.json', './stackato.yml', './README.md', '!./nunit.js', './test/**/*', '!./dist/**/*', '!./node_modules/**/*', '!./Gruntfile.js'], dest: 'dist/'}
                    ]
                }
            },
            'string-replace': {
                dev: {
                    files: {
                        "dist/": ["newrelic.js", "stackato.yml", "package.json"]
                    },
                    options: {
                        replacements: [
                            {
                                pattern: '$APPNAME',
                                replacement: "services-people"
                            },
                            {
                                pattern: '$VERSION',
                                replacement: "1.0.6"
                            },
                            {
                                pattern: 'server.js',
                                replacement: "server.min.js"
                            },
                            {
                                pattern: '$ENV',
                                replacement: "DEV"
                            },
                            {
                                pattern: '$PDS_PWD',
                                replacement: "xxx!"
                            },
                            {
                                pattern: '$INSTANCES',
                                replacement: "1"
                            },
                            {
                                pattern: '$NEWRELIC_TRACE_LVL',
                                replacement: "trace"
                            },
                            {
                                pattern: '$URL1',
                                replacement: "xxx1-dev.com"
                            },
                            {
                                pattern: '$URL2',
                                replacement: "xxx2-dev.com"
                            },
                            {
                                pattern: '$URL3',
                                replacement: "xxx3-dev.com"
                            }
                        ]
                    }
                },
                prod: {
                    files: {
                        "dist/": ["newrelic.js", "stackato.yml", "package.json"]
                    },
                    options: {
                        replacements: [
                            {
                                pattern: '$APPNAME',
                                replacement: "services-people"
                            },
                            {
                                pattern: '$VERSION',
                                replacement: "1.0.6"
                            },
                            {
                                pattern: 'server.js',
                                replacement: "server.min.js"
                            },
                            {
                                pattern: '$ENV',
                                replacement: "PROD"
                            },
                            {
                                pattern: '$PDS_PWD',
                                replacement: "xxx!"
                            },
                            {
                                pattern: '$INSTANCES',
                                replacement: "2"
                            },
                            {
                                pattern: '$NEWRELIC_TRACE_LVL',
                                replacement: "info"
                            },
                            {
                                pattern: '$URL1',
                                replacement: "xxx1.com"
                            },
                            {
                                pattern: '$URL2',
                                replacement: "xxx2.com"
                            },
                            {
                                pattern: '$URL3',
                                replacement: "xxx3.com"
                            }
                        ]
                    }
                }
            },
            jshint: {
                options: {
                    curly: true,
                    eqeqeq: true,
                    eqnull: true,
                    strict: true,
                    globals: {
                        jQuery: true
                    },
                    ignores: ['dist/test/**/*.js']
                },
                files: ['Gruntfile.js', 'dist/**/*.js']
            },
            nodeunit: {
              all: ['dist/test/*-tests.js']
            },
            'closure-compiler': {
                build: {
                    closurePath: '.',
                    js: 'dist/**/*.js',
                    jsOutputFile: 'dist/server.min.js',
                    maxBuffer: 500,
                    options: {
                        compilation_level: 'ADVANCED_OPTIMIZATIONS',
                        language_in: 'ECMASCRIPT5_STRICT',
                        debug: false
//                        formatting: 'PRETTY_PRINT'
                    }
                }
            },
            // Uglify is somewhat the defacto standard for minifying Node.js but Closure compiler yields better perf (ops/sec)
            // http://jsperf.com/testing-code-performance-by-compression-type/3
            uglify: {
                options: {
                    banner: '/*! <%= pkg.name %> <%= grunt.template.today("yyyy-mm-dd") %> */\n'
                },
                build: {
                    src: 'dist/**/*.js',
                    dest: 'dist/server.min.js'
                }
            }
        });

        grunt.loadNpmTasks('grunt-contrib-uglify');
        grunt.loadNpmTasks('grunt-closure-compiler');
        grunt.loadNpmTasks('grunt-contrib-copy');
        grunt.loadNpmTasks('grunt-contrib-clean');
        grunt.loadNpmTasks('grunt-contrib-jshint');
        grunt.loadNpmTasks('grunt-contrib-nodeunit');
        grunt.loadNpmTasks('grunt-string-replace');

        // Default task(s).
        grunt.registerTask('default', ['clean', 'copy:build', 'string-replace:dev', 'jshint', 'closure-compiler:build']);
        grunt.registerTask('prod', ['clean', 'copy:build', 'string-replace:prod', 'closure-compiler:build']);
    };
})();
A better way to implement Back Button in Sencha Touch’s NavigationView

If you’re building a Sencha Touch 2 app and have deployed it to Android, expect that you’re going to get hit up about having the device’s hardware back button working.  Sencha will try to push you towards using routes as evidenced in their docs when discussing history, but to me that’s invasive and goes against the very nature of event driven UI events that have made this framework so popular. Moreover, this gets more complicated when using NavigationView as your main mechanism to move back and forth on a given tab, especially for me where my application had multiple navigation tabs.

To that end, I decided it would be much easier to simply use the browser’s history to manage the back button.  In this way, you can simply push the browser’s state as the user moves forward in your app and then pop the state as the user moves backward in the application. It was also important that different tabs would not interfere with each other’s state. Let’s take a look at how I did that assuming this is an MVC-based application.

Step 1: Add refs and controls to your navigation view’s controller for your view and your navbar with your application’s back button (different from your browser or device back button):

        refs: {
            portal: 'portal',  //Portal Tab Panel
            myContainer: 'MyContainer',  //NavigationView
            navBar: 'myContainer #navbar',  //itemId for navigationBar on NavigationView
        },
        control: {
            myContainer: {
                push: 'onPush'
            },
            navBar: {
                back: 'onBack'  //trap the back event for the app's back button
            }
        }

Here we’re just establishing references to the view components and binding the push and back events to methods we will implement in the next step. Notice that it’s important to trap your app’s back button so it pops the state similar to how the browser or device back button would.

Step 2: Add the implementation for onPush and onBack:

    onPush: function (view, item) {
        history.pushState(); //push the state
    },

    onBack: function () {
        history.back();  //pop the state to trigger listener in step 3
        return false;  // return false so listener will take care of this
    },

Here we leverage the JavaScript history object to push a new state on the stack as the user moves forward in the app’s NavigationView and pop the state from the stack as the user moves back.

Step 3: Add a “popstate” event listener to the window in your Controller’s launch method:

    launch: function () {
        var that = this;
        window.addEventListener('popstate', function () {
            var portal = that.getPortal();  // won't have portal until app is initialized
            if (portal) {
                var container = getTabContainer(portal.getActiveItem());
                if (container && container.getItemId() === "MyTab"
                    && container.getActiveItem().getItemId() !== "baseView") {
                    container.pop();
                }
            }
        }, false);
    },

Here we add a “popstate” event listener to the window so that we can pop the last window off the stack as the user moves back. Notice I do a few checks, one to be sure we have instantiated the portal and the other to check that the container I’m on is the one for this NavigationView (i.e., the “MyTab” check). You could imagine an app with multiple tabs that you want to make sure the other tab controllers aren’t responding to the event when the user uses the device back button (which is NOT tied to a controller; just the popstate event). The final check is to check to see if I am on the “baseView” because I have no need to pop the container if I’m at the root of a particular NavigationView.

That’s all there’s too it. No need to rearchitect your app to use Sencha routes and no complicated code to manage each NavigationView’s state. All you need to do is implement this same code in each of your NavigationView tabs and you’re all set.

Thanks to Greg from Sencha Touch support for pointing out this a viable alternative!

Using SSL Self Signed Certs with Node.js

If you plan to proxy sites or services that are SSL enabled and are signed with self-signed certs, then you need to be aware that you have to configure a few extra parameters to make sure the SSL handshake happens properly. Otherwise, the request goes through without validating the self-signed certs (which is a strange default behavior IMO).

Namely, you have to do the following:

  1. Use the https module (API docs here)
  2. Set the agent to false (unless you plan to provide one)
  3. Set the ca to the location where the self-signed cert is located respective to your node file
  4. Set the rejectUnauthorized to true so that an error is emitted upon failure

Here is a snippet of code that you can use as an example:

var https = require('https'),
        fs = require('fs'),
        host = 'localhost',
        port = 443;

    exports.getTest = function (req, res, next) {
        var url = '/login.html';

        processRequest(req, res, next, url);
    };

    function processRequest (req, res, next, url) {
        var httpOptions = {
            hostname: host,
            path: url,
            port: port,
            method: 'GET',
            agent: false,
            ca: [fs.readFileSync('ssl/myroot_cert.crt')],
            rejectUnauthorized: true
        };

        var reqGet = https.request(httpOptions, function (response) {
            var content = '';
            response.on('data', function (chunk) {
                content += chunk;
            });
            response.on('end', function () {
                try {
                        res.send("Successful SSL Handshake");
                }
                catch (e) {
                    res.send(500);
                }
            });
        });

        reqGet.on('error', function (e) {
            res.send("Unable to SSL Handshake", 401);
        });

        reqGet.end();

        return next();
    }

Restart Node.js without restarting node.js

Found this awesome little npm package called nodemon that allows you to continually develop your node application without having to restart your application every time you make a change to your code. It basically watches the files in your dev directory and restarts the node.js process for you. All you need to do is install it globally and then use nodemon to start your app:

npm install nodemon -g 

nodemon server.js

I realize this might be a little lazy, but so be it. Thanks @rem for this!